
Working With Agentic LLMs: Why Structured Workflows Matter More Than Clever Prompts
A geoscientist’s approach to controlled AI-assisted coding


Over the past several months I’ve been experimenting a lot with agentic LLMs for coding and prototyping of ideas I have in my head.
They are impressive tools, but I’ve found that most the problems people run into aren’t about model quality or prompt creation. They are about structure.
When I first started using these tools, I often began with vague prompts and expected miracles. As I’ve spent more time working with them, I’ve realised that having even a small amount of structure in the process makes everything move more smoothly.
Have I stopped asking these tools random prompts or requesting features without following a proper setup? No. I still do that from time to time. But having a structured starting point makes a big difference.
If you work in petrophysics or geoscience, you’re already used to structured thinking in one way or another.
For example, we don’t just “run logs through a model”.
We QC curves
We define and ensure depth references for the data are accurate
We sanity-check outputs against the ground truth of geology
Essentially, we follow a structured way of doing things.
Agentic LLMs are no different.
They are very popular at the moment. Especially when it comes to vibe coding / assisted coding. If you have tried an Agentic LLM recently, you may have been impressed by what they can do. However, you may have been constantly prompting it, and then start to notice things drifting to eventually find it doesn’t quite do what you originally wanted it do.
This is how I started out earlier last year, and admittedly, I still revert to that from time to time.
On rare occasions, it can feel like you’ve one-shot the prompt and got most of what you wanted. That’s how it felt when Gemini 3 came on the scene.
Used carelessly, these tools can generate impressive-looking output that quietly breaks things or produces unintended results. Used properly, they can speed up the dull, repetitive parts of building tools without taking control away from the human. That balance is one of my core beliefs when working with agentic AI.
This article isn’t about prompt engineering or AI hype. It’s about a process I’ve been using recently to work with agentic LLMs in a more structured way.
Over the past few months, I’ve built several small apps using code assistants, including a life and task management tool that fits how I like to think rather than relying on a paid service. It’s similar to TimeStripe, but runs locally in Docker and is tailored to the features I actually want to use, rather than what someone else thinks I should want.
For this article, I will keep things simple, with the following scope:
A lithology pattern creator, where a user selects a pattern from an available and customises the style of the generated pattern in terms of colour, size and spacing.
What do we actually mean by “agentic” LLMs?
Before we dive into the setting up of the structure to generate my app, we first have to discuss what Agentic LLMs are.
Most people are now familiar with LLMs as tools that you speak to and get back an answer (or an essay).
Agentic LLMs are different.
They’re designed to:
follow multi-step instructions
keep track of state
modify files
complete tasks in sequence
stop and wait for feedback
In practice, they behave much less like a chatbot and much more like a very fast junior developer. That is both powerful and dangerous at the same time.
Without constraints or guidance, an agent will happily run off and build something. However, it may not necessarily be the thing you wanted. Which opens new struggles of fighting with the LLM.
The common failure mode
When I started working with Agentic LLM tools, I started off like most people hoping that I would get an amazing app with a single prompt.
“Build me an app that does X.”
That’s the software equivalent of saying:
“Here’s a LAS file, just give me a full petrophysical interpretation”
You’d never accept that without questions about units, depth alignment, bad data, geological context, or methodology. An agent deserves the same level of care.
The solution isn’t better prompts.
It’s structure.
My CODEX Vibe Coding / Assisted Coding Workflow
The following steps are some that I followed recently to build my Lithology Pattern web app using VSCode and CODEX.
There are numerous ways that you can work with Agentic LLMs, such as using Claude Code, and my way may not necessarily be the best, but it took me from simple prompts to some sense of structure when it comes to creating the app
Step 1: Write a PRD
First, we start with a Product Requirement Document (PRD). These are commonly used within product management, however, they can sometimes have a bad reputation. But, they are a great way to start and get your thoughts down in a structure way.
The PRD for my Lithology Shading and Pattern generator, it fits on a couple of pages and answers three basic questions:
What is this tool supposed to do?
What is it explicitly not doing?
What does “done” look like?
In plain terms, the PRD defines things like:
what inputs the user provides (unit name, top, base, colour)
how the plot should behave
what features are out of scope
Crucially, it also defines non-goals.
No database.
No machine learning.
No clever inference.
That stops the agent from trying to be helpful in all the wrong ways.
The PRD becomes the ground truth. If it’s not written there, it doesn’t exist.
# Product Requirements Document (PRD)
## Lithology Shading Pattern Generator

---

### Overview

This application generates small lithology shading pattern graphics
based on user-selected presets and adjustable visual parameters.

The tool is intended to help geoscientists create consistent,
repeatable lithology shading patterns for use in plots, figures,
and reports.

This is a visual pattern generator.
It does not perform geological interpretation.

---

### Target Users

- Petrophysicists
- Geologists
- Geoscientists preparing plots or technical figures

---

### Core Use Case

1. User selects a lithology type (e.g. sandstone, shale, limestone)
2. User selects a preset shading pattern associated with that lithology
3. User adjusts visual parameters (size, spacing, angle, thickness)
4. A preview graphic updates immediately
5. User downloads the generated pattern as an image file

---

### Functional Requirements

#### Presets
- The application provides a small set of lithology presets
- Each preset defines:
  - base motif (dots, lines, bricks, triangles, etc.)
  - default spacing or density
  - default orientation
  - default stroke thickness

Presets encode convention, not interpretation.

#### User Controls
The user can adjust:
- symbol or motif size
- spacing or density
- orientation or angle
- line or stroke thickness
- foreground and background colour

#### Preview
- A preview graphic is always visible
- Any change to presets or controls updates the preview immediately
- The preview represents the exact output that will be exported

#### Export
- The user can download the generated pattern as an image
- Supported formats: PNG or SVG
- The exported image must match the preview exactly

---

### Validation Rules

- Numeric parameters must accept only numeric input
- Invalid values are clamped or ignored gracefully
- The application must not crash due to invalid input

---

### Technical Context

- The application is a small client-side web app
- Built using React
- No backend or server-side logic
- All rendering occurs in the browser
- All state is local to the application

The choice of framework is incidental.
The focus is on structure and predictable behaviour.

---

### Runtime / Deployment

- The app must run in Docker (development and local usage)
- Primary local run method: `docker compose up`
- The container exposes the dev server on a known port (e.g. 5999 or 3999)
- No backend services are required

---

### Non-Goals

- No automatic lithology classification
- No depth or well data handling
- No geological interpretation
- No adherence to any specific published standard
- No persistence or pattern libraries
- No project management or user accounts

---

### Definition of Done

- User can generate a lithology shading pattern from presets
- User can adjust parameters and see immediate visual feedback
- User can download the pattern reliably
- Output is predictable and repeatable
- No hidden automation or inference
Step 2: Tell the agent how to behave
Before writing any code, you need to give the agent operating rules. Otherwise they can run off and do their own thing, which can lead to frustration later on as the product is not what you expected.
These are not suggestions. But Rules.
Things like:
work in phases
create a task list before implementing anything
complete one task at a time
stop after each task
ask for approval before continuing
This feels unnecessary the first time you do it. Then you skip it once and immediately regret it.
Trust me, it is definitely worth ensuring there are rules!
These rules slow the agent down just enough to keep you in control, very similar to forcing a pause between QC steps in a petrophysical workflow.
This key. In my view, we should always have a human in the loop, no matter how much we want to automate things and get a result very quick.
# Codex: Task-list-first operating mode

When starting work:
1) Read docs/PRD.md and docs/CODING_TASKING_MODE.md.
2) Create docs/TASKS.md using the provided template if missing.
3) For the current phase, expand tasks into subtasks.
4) Implement tasks **one main task at a time only**.
5) After completing each main task:
   - Summarise changes (files/endpoints/pages)
   - Provide how to verify using Docker (commands + URL)
   - Ask me whether to continue to the next main task

Important guardrails:
- Do NOT work on the next main task until I confirm.
- Keep changes minimal and aligned to PRD scope guardrails.
- Do not refactor unrelated code while completing a task.
- Do not introduce new libraries or files unless explicitly required by the task.

Task tracking rules:
- Use Markdown checkboxes in TASKS.md.
- When a main task or subtask is completed, replace `- [ ]` with `- [X]` (capital X).
- Add a short **Verification** note under the task describing how it was validated.
- Do not mark tasks complete unless the code runs and acceptance steps are verified.

Changelog rules:
- After completing each main task, append an entry to `docs/CHANGELOG.md` under the existing **[Unreleased]** section only.
- Use headings: **Added / Changed / Fixed**.
- Keep entries short, factual, and user-facing.
- Never overwrite previous changelog history.

Closing routine (mandatory):
1) Update TASKS.md with `- [X]` and verification note.
2) Update CHANGELOG.md under [Unreleased].
3) List files changed and tests to run.
4) Ask: “Proceed to next main task?”Step 3: Freeze the task list early
Once the PRD is understood, the agent creates a task list.
Not vague goals, but concrete, checkable steps:
create the layout
add the input table
create an empty lithology track
wire table changes to the plot
The key point is that the task list is agreed up front.
No scope creep.
No “while I was here I also added…”.
To start, I provide CODEX with a simple prompt, which will help me understand if the agent has understood the problem and generated the right tasks.
You are operating in task-list-first mode.

Read the PRD and the tasking rules first.
Use the task list as the source of truth.
Docker is mandatory for running and verification.

Before writing any code:
– summarise your understanding of the PRD
– identify the next main task
– expand that task into concrete subtasks in the task list
– explain how the task will be verified using Docker

Then stop and ask whether to proceed.
This forces the agent to show its interpretation and define the steps that it is going to take before it acts.
This is similar to how we already work with subsurface data: we define the steps, then execute them in order. This may be in our heads after years of practice, or a written down checklist that we follow each time.
Once we ask the agent, we generate our Tasks list, which covers several phases, each with main tasks.
# TASKS
## Lithology Shading Pattern Generator

> Main task = Phase.
> Subtasks live under each Phase.
> Use - [X] for completed items and include a Verification note per Phase.

---

## Phase 0 — Planning
- [X] Read and understand PRD
- [X] Confirm scope and non-goals
- [X] Agree task breakdown

**Verification:** PRD reviewed; scope/non-goals confirmed; phases defined.

---

## Phase 1 — Application Skeleton (MAIN TASK)
- [X] Create basic application layout
- [ ] Define preview area for pattern display
- [ ] Define control panel container

**Verification:** _To be filled when Phase 1 complete (e.g. app runs locally; layout visible)._

---

## Phase 2 — Pattern Presets (MAIN TASK)
- [ ] Define lithology preset data structure
- [ ] Implement initial preset set (e.g. sandstone, shale, limestone)
- [ ] Render default pattern for selected preset

**Verification:** _To be filled._

---

## Phase 3 — User Controls (MAIN TASK)
- [ ] Add controls for symbol/motif size
- [ ] Add controls for spacing/density
- [ ] Add controls for orientation/angle
- [ ] Add controls for stroke thickness
- [ ] Add controls for background colour
- [ ] Add controls for foreground colour
- [ ] Wire controls to update preview

**Verification:** _To be filled._

---

## Phase 4 — Preview Behaviour (MAIN TASK)
- [ ] Ensure preview updates immediately on change
- [ ] Handle invalid input gracefully
- [ ] Ensure preview reflects final output exactly

**Verification:** _To be filled._

---

## Phase 5 — Export (MAIN TASK)
- [ ] Add download functionality
- [ ] Support PNG or SVG export
- [ ] Verify exported image matches preview

**Verification:** _To be filled._

---

## Phase 6 — Polish and Validation (MAIN TASK)
- [ ] Improve visual clarity of patterns
- [ ] Remove debug artefacts
- [ ] Confirm behaviour matches PRD

**Verification:** _To be filled._

---
The kick-off prompt
Once the tasks are created I give CODEX the next prompt to read the TASKS.md, the CODING_TASKING_MODE.md and the PRD.md files
You are operating in “Task-list-first” mode.

Follow these rules exactly:
- Read docs/PRD.md and docs/CODING_TASKING_MODE.md (and docs/wireframes.md if present).
- Use docs/TASKS.md as the source of truth for work.
- Docker is mandatory: verification must be via docker compose, not local npm.
- Do not implement the next main task until I confirm.
- Keep scope aligned to PRD. No extra features.

Start now:
1) Briefly summarise the PRD in 6–10 bullets.
2) Identify the current main task (next Phase with unchecked checkbox) in docs/TASKS.md.
3) Expand ONLY that main task into 3–8 concrete subtasks directly under it in docs/TASKS.md.
   - Each subtask must be checkable and small.
   - Do NOT implement anything yet.
4) Tell me the exact docker commands + URL you will use for verification once the main task is complete.
Then stop and ask: “Proceed to implement this main task?”
That last instruction — stop and ask — is critical.
It forces the agent to stop after each task and allow you time to check if what it has done makes sense to you and meets your expectations. In petrophysical terms, it’s the equivalent of stopping after each stage in the petrophysical workflow to take a moment to see if you are still within the limits of what is expected. No point going of doing saturation height modelling if the end result is a simple porosity and water saturation interpretation.
If the summary is wrong, I correct it immediately. If the subtasks don’t make sense, I adjust them.
Nothing irreversible has happened yet.
Expanding subtasks before coding
One thing I now insist on is that Codex expands the next main task into subtasks before it starts implementing anything.
This does two things:
it makes assumptions visible early
it prevents the agent from silently bundling multiple ideas into one change
Only once the subtasks look sensible do I let the agent proceed.
If a subtask still feels too big, I ask CODEX to break it down further. That pause almost always saves time later.
Step 4: One task, then stop
One main task, then stop
Once I approve the subtasks, the workflow becomes very repetitive — and that’s intentional.
For each main task, I use a prompt along the lines of:
Proceed with the approved main task only.

Implement the subtasks in order.
Verify the result using Docker.
Update the task list and the changelog.
Then stop and ask whether to continue.
It may be possible to carry on by prompting it to proceed, but there will come a point when the context window becomes full or resets, and you need to remind the agent what it is to do.
With this prompt, CODEX implements the work, updates the task list, appends a short changelog entry, and then waits.
No freelancing.
No “while I was here I also added…”.
This is exactly how we already work when we’re being careful: do one thing, check it, write it down, then move on.
The changelog is part of the control loop. I require Codex to update a changelog after every main task.
Not at the end of the project — after each step.
Entries are short and factual:
what was added
what changed
what was fixed
# Changelog

## [Unreleased]

### Added
- Initial project documentation (PRD, task list, operating mode)
- Docker-based dev environment and run instructions
- Lithology preset selector and initial pattern preview rendering
- Symbol size, spacing, angle, and stroke controls wired to the preview
- SVG/PNG export support with format selector and download button
- Foreground/background color controls wired to preview and export
- Added silt and dolomite lithology presets

### Changed

### Fixed
- Reduced preview min-heights to avoid vertical scrollbars
- Further reduced preview height and added bottom spacing
- Clamped preview height and removed extra min-height for smaller layouts
- Moved preset + symbol size controls into a single top row
- Expanded pattern spacing to reflect larger symbol size values
- Increased preview height and stretched the preview SVG to fill the area
- Sized the preview SVG to the canvas to avoid stretched patterns
- Improved numeric input handling with clamped blur behavior and stable preview updates
- Fixed preview color updates by wiring color variables to the SVG
- Updated silt and dolomite pattern motifs
That gives me a running audit trail of what the agent has done and why. If something looks odd later, I can see exactly when it was introduced.
Again, this should feel familiar. It’s no different from keeping processing notes on a well. Fast work without traceability is how mistakes survive.
Step 5: The right mental model
The most useful way I’ve found to think about agentic LLMs is this:
Treat them like a junior geoscientist with infinite energy.
They don’t understand lithology.
They don’t understand depth.
They understand instructions.
You stay responsible for:
assumptions
naming
boundaries
correctness
The agent handles the repetitive glue work.
Humans remain in charge of decisions.
Why this approach actually scales
This structured way of working does three important things:
Reduces rework: Errors are caught early, when they’re cheap to fix.
Creates traceability: You can see what was decided, when, and why.
Keeps control with the domain expert: The agent assists, it doesn’t steer.
That matters if you’re building tools that other geoscientists will rely on, not just demos.
Encountering Bugs or Creating Minor Enhancements
As you progress through the creation of your app, you may find that some bits of it are not quite right and you want to tweak it. Or you encounter an error that needs to be fixed.
I am still refining how best to tackle this in different situations. Sometimes if it is something annoying, I will get CODEX to fix it there and then, or if there are several things I will get it to group them into a new phase for fixing later on whilst I get the main functionality together.
Do not implement anything yet.

Add this enhancement to docs/TASKS.md under the most appropriate future Phase.
If no Phase fits, create a new Phase titled “Enhancements” and add it there.

Also add a short note in docs/CHANGELOG.md under [Unreleased] → Changed:
- “Planned: <one line description>”

Then stop and ask me whether to schedule it now or leave it for later.
My Lithology Palette App Progression
The following section shows the development of my app through different phases.
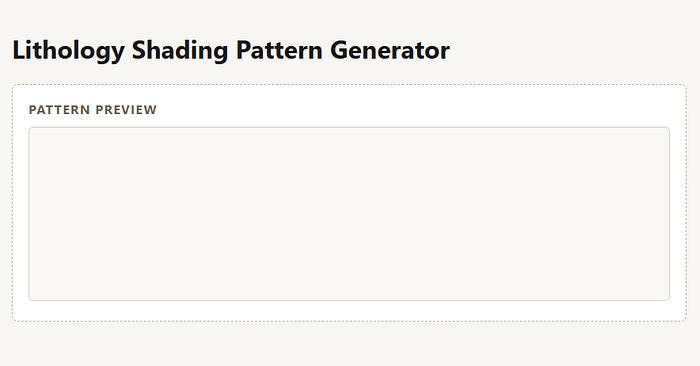
The initial phase of the task list focused on getting the Docker environment setup, tested and displaying the basic UI in a browser.
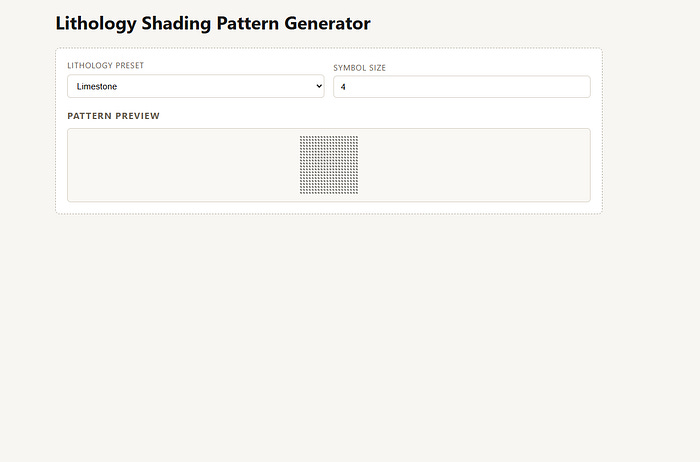
As the phases and tasks progressed, the Agent added controls for lithology presents and a symbol size. However, there was the issue of the pattern rending very small in the preview section, which was later corrected.
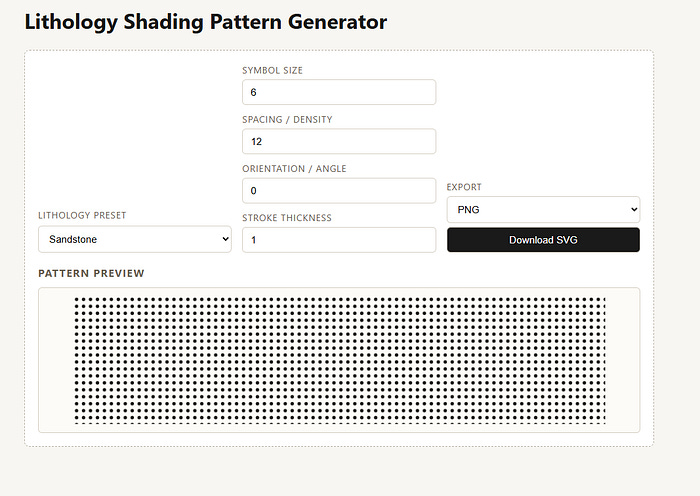
Eventually all of the controls were added, but it didn’t look great in terms of the layout. The dropdowns were too large, took up a lot of room and could be better arranged.
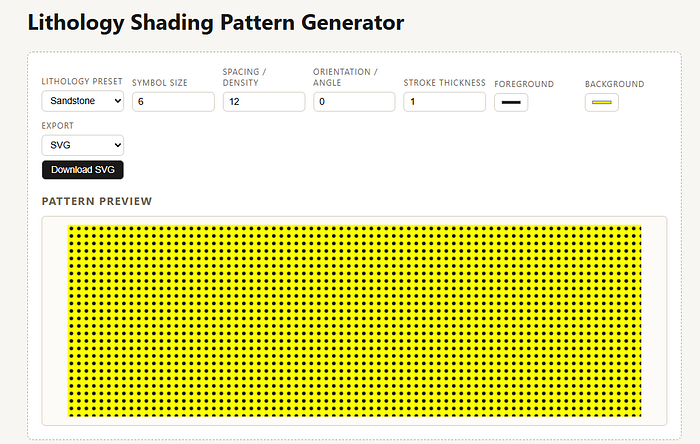
Finally, once all phases were complete and a few enhancements were added to allow colours to be changed I ended up with the following UI, which is fully responsive.
It still has a few issues that need to be addressed, but at this point I have managed to get an MVP of my idea working and testable.
The new issues and enhancements will feed into a PRD for version 1.1, and the whole process starts again.
Summary
Whilst experimenting with Agentic LLMs I have found it very interesting and impressive with what they can do with some structure, especially when it comes to coding.
Is the result perfect? No, but it allows me to quickly prototype an idea and get up and running quickly so that I can get it to do the job I wanted it to do. If I like it enough, I will progress it on to the next stage. if I don’t I will drop it and move onto the next things.
Also, Agentic LLMs don’t replace expertise.
They amplify it.
If your thinking is vague, they’ll amplify the vagueness.
If your process is clear, they’ll move very quickly in the right direction.
Treat them like a capable junior colleague, not a mystical entity that can create things out of thin air or turn lead into gold, and they will become genuinely useful.