
Bring Your Python Terminal to Life With Colour and Clarity
4 Ways to Enhance Your Python Terminal Output


When working with Python, we often rely on the terminal to output content based on what is happening in our script and how it is progressing. However, if we overuse the Python print() function without any structure, it can lead to confusion and wasted time trying to find the correct output you are looking for (especially if you have to find and comment out other print statements in your code).
There are a number of Python libraries that can help you enhance the output from the print statement and make reading them a lot more interesting and fun.
In this article we will look at 4 easy to use Python libraries that will help bring a dash of colour and style to your terminal.
colorama: Cross Platform Text Colouring
The colorama library is a lightweight tool that allows you to easily change the colour of text output in the console. One of the nice benefits of this library is being able to ensure consistency across multiple platforms (which is something I have found useful when working on both macOS and Windows platforms).

To install colorama, we can use the following command:
pip install coloramaOnce the library is called upon, you can change a variety of text styles, such as:
Foreground and background colours (Fore.RED, Back.GREEN, etc.)
Text styles like bright, dim, and reset (Style.BRIGHT)
There is also an optional auto-reset option which will prevent colours leaking into any lines that follow where it is being used.
To apply the colouring, we can see how it is done using the example below.
from colorama import Fore, Back, Style, init

init()  # Initialise once, especially important on Windows

print(Fore.RED + "This is red text")
print(Back.GREEN + "With a green background")
print(Style.BRIGHT + "And bright text")
print(Style.RESET_ALL + "Back to normal")
We can create a more advanced version of the above by converting it into a function and allow us to print custom status message to the console:
from colorama import Fore, Back, Style, init

# Initialise colour support (especially important on Windows)
init(autoreset=True)

def print_status(message, status):
    if status == "OK":
        colour = Fore.GREEN + Style.BRIGHT
    elif status == "WARNING":
        colour = Fore.YELLOW + Style.BRIGHT
    elif status == "ERROR":
        colour = Fore.RED + Style.BRIGHT
    else:
        colour = Fore.WHITE

    print(f"{colour}[{status}]{Style.RESET_ALL} {message}")

# Simulated output
print_status("Configuration loaded", "OK")
print_status("Disk space is low", "WARNING")
print_status("Connection failed", "ERROR")
print_status("Retrying in 5 seconds...", "INFO")
You will notice in the above code we have added an autoreset=True parameter to the init() call. This will allow the style to be reset after each print statement.
Another example of using colorama is to mark different stages of a script, which can be handy in situations where we have several phases of code to pass through
from colorama import Fore, Style, init

init(autoreset=True)

print(Fore.MAGENTA + Style.BRIGHT + "\n=== Stage 1: Data Validation ===\n")

print("→ Checking input formats...")
print("→ Looking for missing values...")
print(Fore.GREEN + "✔ All checks passed\n")
In addition to colouring the text, we can also colour the background of the text, which can create more of an impact and draw your attention to situations within your code. For example, status messages:
from colorama import Back, Fore, Style, init

init(autoreset=True)

print("\nSystem Status:")
print(Back.GREEN + Fore.BLACK + "  READY   " + Style.RESET_ALL + " – System is online.")
print(Back.YELLOW + Fore.BLACK + " WARNING  " + Style.RESET_ALL + " – High memory usage.")
print(Back.RED + Fore.WHITE + "  ERROR   " + Style.RESET_ALL + " – Network unavailable.\n")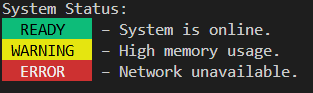
termcolor: Inline Text Highlighting
Another favourite tool of mine is termcolor. This library is also lightweight, but slightly easier to use compared to colorama, especially when it comes to adding colour to individual pieces of text within a longer string.
Additionally, there is no need to apply any resets to the styling, it is all handled by the library.
To install termcolor:
pip install termcolorTo use termcolour, we import the colored module from termcolor. When we call upon colored we supply the text we want to colour, followed by the text colour, the background colour, and a list of styles such as bold, underline or reverse.
from termcolor import colored

print(colored("Warning!", "red"))
print(colored("Success", "green", attrs=["bold"]))
print(colored("Info", "cyan", "on_white"))
In the colorama example above we printed out multiple status messages. We can do the same using termcolor:
from termcolor import colored

def label(text, level):
    colours = {
        "OK": "green",
        "WARNING": "yellow",
        "ERROR": "red"
    }
    return colored(f"[{level}]", colours.get(level, "white"), attrs=["bold"]) + f" {text}"

print(label("Operation completed.", "OK"))
print(label("Low disk space.", "WARNING"))
print(label("Upload failed.", "ERROR"))
Instead of using an if statement, we can also use a dictionary which contains our status colours, and then perform a lookup.
One of the nice things about using termcolor is the ability to apply inline colour styling. This can be somewhat clunky in colorama, especially if you are trying to apply styling multiple times:
In colorama:
from colorama import Fore, Style

filename = "data.csv"
print("Processing file: " + Fore.CYAN + filename + Style.RESET_ALL)
In termcolor:
from termcolor import colored

filename = "data.csv"
print(f"Processing file: {colored(filename, 'cyan')}")
Another example of the inline formatting with termcolor is when using conditional logic in f-strings:
from termcolor import colored
status = "ERROR"
msg = f"System check: {colored(status, 'red') if status == 'ERROR' else status}"
print(msg)
It is also handy when building up a tabular style log or summary table
from termcolor import colored

headers = [colored("Name", "cyan"), colored("Status", "yellow")]
print(f"{headers[0]:<18} {headers[1]}")
print(f"{'file1.txt':<10} {colored('OK', 'green')}")
print(f"{'file2.txt':<10} {colored('FAIL', 'red')}")
rich: Creating Rich Styled Output
rich is a great library which allows you to fully customise the text colour and style within your terminal. It has much more functionality than colorama and termcolor.
A couple of the nice things I like about this library is being able to add syntax highlighting and handle markdown styling. Below is an image from the rich PyPi page which shows the power of what this library can do.

To install the library, we call upon the following:
pip install richAnd to get started, we can use this simple example.
from rich import print

print("[bold magenta]Hello, Rich![/] This is [green]in colour[/].")
By using the square brackets around the text we want to change it almost feels like HTML.
We can recreate the status example that we have used above using the following code.
from rich import print

def show_status(message, status):
    colours = {
        "OK": "green",
        "WARNING": "yellow",
        "ERROR": "bold red"
    }
    print(f"[{colours.get(status, 'white')}][{status}][/] {message}")

show_status("System initialised", "OK")
show_status("Memory usage is high", "WARNING")
show_status("Connection lost", "ERROR")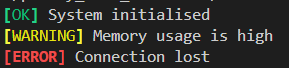
One of the nice features of rich is being able to stylise any code snippets directly in the console and include line numbers.
from rich.console import Console
from rich.syntax import Syntax

code = """def greet(name):\n    return f"Hello, {name}!"\n"""

syntax = Syntax(code, "python", theme="monokai", line_numbers=True)
Console().print(syntax)
Creating tables is fairly simple compared to the other methods.
rich has a built in Table module that allows you to add columns and rows, which are then formatted appropriately.
from rich.table import Table
from rich.console import Console

table = Table(title="File Status")

table.add_column("File", style="cyan")
table.add_column("Status", justify="right", style="bold")

table.add_row("data.csv", "[green]OK[/]")
table.add_row("report.pdf", "[yellow]Pending[/]")
table.add_row("archive.zip", "[red]Failed[/]")

Console().print(table)
We can even integrate markdown into our output using rich, which is one my favourite ways to take notes.
from rich.console import Console
from rich.markdown import Markdown
from rich.panel import Panel

console = Console()

md = Markdown("""
# 🛢️ Formation Evaluation Report

**Well Name:** MysteryWell-02
**Field:** In the sea
**Operator:** Example Energy Ltd.

---

## Lithology Overview

- **Sandstone**: Clean, medium-grained, good sorting
- **Shale**: High gamma, low resistivity
- **Coal**: Sharp density drops, high resistivity spikes

---

## Key Log Tracks Used

- GR (Gamma Ray)
- NPHI / RHOB (Neutron-Density Crossplot)
- DT (Sonic)
- RESD (Deep Resistivity)

---

## Summary

This well penetrated a **deltaic sequence** with interbedded sands and shales.
Primary reservoir is interpreted between **3,120 m – 3,245 m MD**.

Water saturation estimated using *Simandoux* model.

---
""")

panel = Panel(md, title="📋 Evaluation Summary", subtitle="Generated by Bob")

console.print(panel)
When we run the above, we get out a very nice (for a terminal output) looking report.

pyfiglet: Having Fun With Big Text
The final library we will look at is pyfiglet.
This library is a Python port of the classic FIGlet tool which is used to turn plain text into large ASCII banners.
Whilst it may not always be practical, it can be fun to play with, especially when you are publishing CLI scripts and want to add a bit of personal flair to it.
For me, when using this library I get a feeling of nostalgia of old command scripts with fancy graphics and ASCII art in the console.
To install the library, we can call upon the following
pip install pyfigletTo begin using pyfiglet, we can call upon the following lines.
from pyfiglet import figlet_format

print(figlet_format("Well Log", font="slant"))
When we run this, we get the following output in the console:

We can use it in interesting ways such as:
At the end of a script and in combination with other printing libraries we have discussed:
from pyfiglet import figlet_format
from rich import print

print(figlet_format("All Done!", font="slant"))
print("[green]Well analysis complete. Report saved to disk.[/]")
Summary
Whilst these libraries won’t replace the print statement, they will help you get more out of it. This will take your terminal output from grey and boring to something much more expressive and interesting.
Have you used these libraries? If so, do you have a favourite?
Or perhaps, you use one that I haven’t mentioned? If so, drop it in the comments and I will add it to my list of libraries to explore.